We are glad to introduce the Arduino-Lite to you.
Arduino-Lite is a lightweight high-performance firmware library for AVR MCUs, which is developed based on the original Arduino project. We make it easy to use, just like the Arduino. Compared to the original library, Arduino-Lite generates smaller binaries and perform faster.
And now, we are honored to introduce the Arduino-Lite to the public, and to make it open source.
The open source version of Arduino-Lite can be downloaded at Google Code:http://code.google.com/p/arduino-lite/
0. Supported Devices
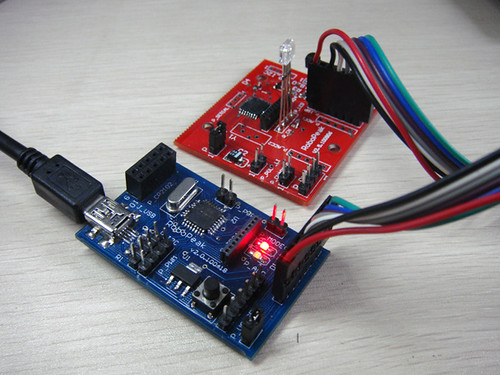
Besides the standard Arduino controller boards based on Atmega328/168, all third-party boards using the following AVR chips are supported. We also published a driver-less AVR/51 programmer called RP USB Connector which is used internally by RoboPeak Team. The firmware of RP USB Connector is also developed with the Arduino-Lite library.
1. Why yet another library, and why to use it
Arduino and Arduino-Lite are both written with C++/C, and based on avr-gcc, but the Arduino-Lite has some pretty advantages:
- Very very lightweight
Most binaries based on Arduino-Lite are 50% smaller than which based on Arduino.
- High Efficiency
Many functions provided by Arduino-Lite, such as DIGITAL_WRITE, which is equivalent to the digitalWrite in the Arduino, implemented by only one AVR instruction.
- More AVR chips and frequencies are supported
Besides Atmega8(A), Atmega168(PA), Atmega328(PA), Atmega1280, Arduino-Lite also supports Attiny2313, Attiny26, Atmega48(PA), Atmega88(PA)
Working frequencies supported by Arduino-Lite are ranging from 1Mhz to 20Mhz.
However, Arduino-Lite advances in following features as well:
- Self-contained, no third-party tools, compilers or libraries dependencies.
With Arduino-Lite, the only tool you need to develop, compile or burn to devices is the common text editor, which is delivered by most modern operating system.
Avr-gcc(WINAVR) and relative libraries comes with the Arduino-Lite package.
- Flexible and easy-to-integrate Makefile-based compiling system, but no more Makefile composing or generating operations are required.
The easiest way to create a new Arduino-Lite project is decompress the template and rename it. You can place your code in any place in the project directory. And Arduino-Lite will compile your project properly. You don’t need to modify/compose/generate Makefile anymore.
1.0 Who and when to use Arduino-Lite
We think Arduino-Lite will be perfect choice in following situations:
- Binary size or device cost sensitive, such as situations have to use Attiny or Atmega48 which contain small ROMs.
- Performance sensitive, such as some real-time applications like industry controlling and robot controlling
- Make gurus or IDE fans
- Interested in Arduino/AVR, expecting a better IDE than the Arduino IDE and more effective firmware library
- Developing firmware for those devices and frequencies not supported by Arduino in Arduino-way.
Arduino-Lite might not be suitable for:
- Who don’t like command line or Makefiles (We are planing to make Arduino-Lite to support the Arduino IDE)
- Whose projects are based on third-party Arduino libraries
1.1 Advantages shared by Arduino and Arduino-Lite
It is easy to do some common IO operations with Arduino, such as digitalWrite() digitalRead() and analogWrite(). This makes e-artists easier to develop their artworks, not requiring them to be familiarly with registers like DDR and PIN. Hobbyists without any background in MCU development can access the PWM features without knowing the working modes of the timers.
For instance, developing with the standard avr-gcc (WINAVR), developers need to write the following code to make the LED fading:
1
2
3
4
5
6
7
8
9
10
11
12
13
|
//Set PWM mode: fast mode for timer 0
sbi(TCCR0A, WGM01);
sbi(TCCR0A, WGM00);
//set timer 0 prescale factor to 64
sbi(TCCR0B, CS01);
sbi(TCCR0B, CS00);
sbi(DDRB, PB1);
sbi(TCCR, COM11);
unsigned
char
led_brightness = 0;
for
(led_brightness=0; led_brightness = 255; led_brightness++)
{
OCR01 = led_brightness;
}
|
Above code require the developer understand the name and usage of registers, what harden the development. Developers, even if experienced, might forget the detailed usage of some register.What’s more, registers of different AVR chips are differing from each other.
Based on Arduino, code can be simple like this:
1
2
3
4
5
6
7
|
pinMode(9, OUTPUT);
unsigned
char
led_brightness = 0;
for
(led_brightness=0; led_brightness = 255; led_brightness++)
{
analogWrite(9, led_brightness);
}
|
Arduino makes code simple and expressive, and makes it compilable across different chips as well.
We think the following features make the Arduino excellent:
We think the following features make the Arduino excellent:
- Wrap common operation into functions, to hide the difference of devices
- Renaming AVR IO pins to a serial number; compared to names like PB1 and PC3, it is quite easier to use. This feature hides the different pin binding of chips, and makes programs cross-platform.
The above advantages make the Arduino widely used. While developing the Arduino-Lite, we inherits these features. The code base on Arduino-Lite with the same functionality looks like this:
1
2
3
4
5
6
7
|
PIN_MODE(9, OUTPUT);
unsigned
char
led_brightness = 0;
for
(led_brightness=0; led_brightness = 255; led_brightness++)
{
ANALOG_WRITE(9, led_brightness);
}
|
Almost the same as the Arduino version, only letter cases are changed. In order to easily migrate Arduino code to Arduino-Lite, most Arduino-Lite version of the functions in the Arduino come with the all capitalized letters.
1.2 The defects to the Arduino
Slow
The implementation of digitalRead() digitalWrite() and analogWrite() functions in Arduino are very heavy, and less effective.
In order to make the numbering pin feature work properly, while invoking IO operating functions, pin numbers need to be converted to the controller register. Let us see into the analogWrite() function:
1
2
3
4
5
6
7
8
9
10
11
12
13
14
15
16
17
18
19
20
21
22
23
24
25
26
27
28
29
30
31
32
33
34
35
36
37
38
39
40
41
42
43
44
45
46
47
|
void
analogWrite(uint8_t pin, uint8_t val)
{
pinMode(pin, OUTPUT);
if
(digitalPinToTimer(pin) == TIMER1A) {
// connect pwm to pin on timer 1, channel A
sbi(TCCR1A, COM1A1);
// set pwm duty
OCR1A = val;
}
else
if
(digitalPinToTimer(pin) == TIMER1B) {
// connect pwm to pin on timer 1, channel B
sbi(TCCR1A, COM1B1);
// set pwm duty
OCR1B = val;
}
else
if
(digitalPinToTimer(pin) == TIMER0A) {
if
(val == 0) {
digitalWrite(pin, LOW);
}
else
{
// connect pwm to pin on timer 0, channel A
sbi(TCCR0A, COM0A1);
// set pwm duty
OCR0A = val;
}
}
else
if
(digitalPinToTimer(pin) == TIMER0B) {
if
(val == 0) {
digitalWrite(pin, LOW);
}
else
{
// connect pwm to pin on timer 0, channel B
sbi(TCCR0A, COM0B1);
// set pwm duty
OCR0B = val;
}
}
else
if
(digitalPinToTimer(pin) == TIMER2A) {
// connect pwm to pin on timer 2, channel A
sbi(TCCR2A, COM2A1);
// set pwm duty
OCR2A = val;
}
else
if
(digitalPinToTimer(pin) == TIMER2B) {
// connect pwm to pin on timer 2, channel B
sbi(TCCR2A, COM2B1);
// set pwm duty
OCR2B = val;
}
else
if
(val < 128)
digitalWrite(pin, LOW);
else
digitalWrite(pin, HIGH);
}
|
The code is long. If we operate the registers directly, it will be:
1
|
OCR01 = led_brightness;
|
The difference between codes makes 10x difference in performance. This makes Arduino not be suitable for efficiency-sensitive products or fields.
The size of the binary
For the same reason, the size of the binary of Arduino are really big. The fading led example is about 2kb compiled with the Arduino library, what is about half of the available rom size of Atmega48/attiny chips.
Binaries like this size will not be acceptable in cost-sensitive situations, and even to the hobbyists, large binaries limit the feature of the program.
Only limited AVR models are support, and have some restrictions on external hardwares
Arduino only support Atmega8/Atmega168/Atmega328/Atmega1280 working on 8MHz or 16MHz with external crystal. Some products doesn’t need such high performance chips, might choose Attiny series, atmega48 or atmega88, which is cheaper. In some application, the two frequencies cannot cover the requirement of performance or power consumption. Arduino cannot help in these situations.
1.3 Modifications made by Arduino-Lite
Thanks to the marcos in Arduino-Lite, we keep it simple but providing higher performance and smaller binary size. Almost all core functions in Arduino have their Arduino-lite version, most of which are implemented by marcos. In Arduino-Lite, the conversion from numbering pin to AVR registers are finished in the compiling phase, which is in the runtime in Arduino.
Let take the PWM example once more: The equivalent of analogWrite(pin, value) in Arduino-Lite is ANALOG_WRITE(pin, value).
Outputing PWM signals to the Pin 9 should be like this:
1
|
ANALOG_WRITE(9, pwm_value);
|
This is almost the same as the arduino version, but after macro expension:
1
2
3
4
5
6
|
#define ANALOG_WRITE( pin, val ) \
do
{ \
PWM_ENABLE(pin); \
PWM_SET(pin,val); \
} \
while
(0)
|
And expend the PWM_ENALBE and PWM_SET:
1
2
|
sbi(TCCR1A, COM1A1);
OCR1A = pwm_value;
|
Compared to the heavy lone Arduino version,Arduino-Lite generates only 2 AVR instructions to fulfill the same requirement.
Arduino-Lite also provide reduced interfaces, such as PWM_SET(pin, value) generates only 1 instruction.
Let’s compare the binary size of the LED fading example
LED Fading(PWM)
- Arduino version: 2048 byte
- Arduino-Lite version: 100byte
In Arduino, ADC pins (PC port) can only operate in analog mode (using analogRead), and cannot be used as digital IO port. In Arduino-Lite, we extended the pin numbers of Arduino, and make adc pins to be operated as digital IOs. The pin definition of AtMegaX8(m48,m88,m168,m328):
1
2
3
4
5
6
7
8
9
10
11
12
13
14
15
16
17
18
|
// ATMEL ATMEGA8 & 168
//
// +-\/-+
// PC6 1| |28 PC5 (AI 5/*D19)
// (D 0) PD0 2| |27 PC4 (AI 4/*D18)
// (D 1) PD1 3| |26 PC3 (AI 3/*D17)
// (D 2) PD2 4| |25 PC2 (AI 2/*D16)
// PWM+ (D 3) PD3 5| |24 PC1 (AI 1/*D15)
// (D 4) PD4 6| |23 PC0 (AI 0/*D14)
// VCC 7| |22 GND
// GND 8| |21 AREF
// *(D20) PB6 9| |20 AVCC
// *(D21) PB7 10| |19 PB5 (D 13)
// PWM+ (D 5) PD5 11| |18 PB4 (D 12)
// PWM+ (D 6) PD6 12| |17 PB3 (D 11) PWM
// (D 7) PD7 13| |16 PB2 (D 10) PWM
// (D 8 )PB0 14| |15 PB1 (D 9) PWM
// +----+
|
This is the second part which introduces the installation and usage of the Arduino-Lite.
Arduino-Lite is a lightweight high-performance firmware library for AVR mcus, which is developed based on the original Arduino project. We make it easy to use, just like the Arduino. Compared to the original library, Arduino-Lite generates smaller binaries and perform faster.
Some brief introduction to the Arudino-Lite: Arduino-Lite, Lightweight AVR library(1)
1. What are included in Arduino-Lite?
Arduino-Lite hosted on Google Code consists of:
- Source code of Arduino-Lite firmware library
- WINAVR (avr-gcc) compiler set
- Arduino-Lite compiling system
- Tools
- Samples and templates
Arduino-Lite users only need to download the package to develop, compile, burn/upload and even debug AVR programs, along with system default text editors(notepad, vim); no third-party library are required. Arduino-Lite, for sure, do not prevent you from using any software or libraries.
2. Download and configure Arduino-Lite
2.1 Get Arduino-Lite
The open source version of Arduino-Lite can be retrived from Google Code:http://code.google.com/p/arduino-lite/。There are two ways to get Arduino-Lite:
- Compressed Package
In the Download section of our Google Code project page, we released compressed packages of Arduino-Lite, what are named like arduino-lite-r1.0.zip. After downloading, no installation steps are needed, just decompress to some folder.
- SVN
Check out any revision anonymously from the svn repository hosted on Google Code.
After downloading and decompression, the directory tree should like this:
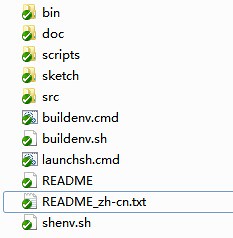
- src contains all source code of Arduino-Lite firmware library
- User projects, templates and samples are placed under sketch directory
- scripts contains some scripts related to the compilation process
- bin contains tools and avr-gcc
2.2 Environment requirement
The Arduino-Lite firmware library is cross-platform, what can be compiled under almost all operating systems; but our compiling system is currently stick on windows. After some simple modification, our compiling system can also work well under Linux/MacOS. We will provide this support in the future.
The compiling system of Arduino-Lite has been tested under the following operating systems:
- Windows XP 32bit
- Windows Vista 32bit and 64bit
- Windows 7 32bit and 64bit
2.3 Configuration at the first time
While you are using this tool-set for the first time (just checked out from svn or decompressed from the downloaded package), please just execute the batch “buildenv.cmd” at the root directory of Arduino-Lite. “buildenv.cmd” is responsible to set up the working environment of Arduino-Lite automatically:
- Set up bash environment (based on msys)
- Decompress the WINAVR (avr-gcc) compilers
- Configure environment variables (if needed)
You should see the following command prompt window:
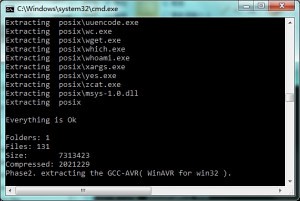
After executing this batch file, Arduino-Lite is ready to use.
3. Develop with Arduino-Lite
3.1 Create an Arduino-Lite project
The compilation system of Arduino-Lite follows the simple and stupid philosophy. No more third-party tools, no more makefiles, workable development environment is available out of box. Construct projects by writing Makefiles, using IDEs like AVRStudio, Eclipse or Arduino IDE are also welcomed.
The sketch directory of Arduino-lite is used to contain projects. In this example, we suppose the project is named “myAVR”. Some simple steps to achieve this:
a. Decompress the template.zip and get a directory tree like this:
(The “launchsh.cmd” should be seen at the sketch/template/ directory)
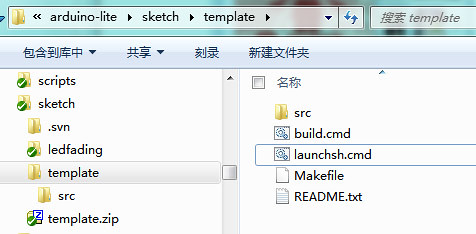
template.zip is the template of Arduino-Lite projects, what contains ready-to-use Makefile and sample source code at src/main.cpp.
The compilation system of Arduino-Lite use Makefile to compile source codes, which process are contained in a bash shell. You can launch a bash shell by executing “launchsh.cmd”.
b. Rename the template directory to your project’s name, in this case, “myAVR”
Utill now, a new Arduino-Lite project has been created, which will generate code for Atmega168 at 16MHz. The project contained by template.zip is a LED fading sample, will output at arduino pin 11. If your program need to work on different chip or frequency, please refer to the rest part of this article.
3.2 Add files to project
Just place source code under the src directory or its sub directories (.cpp, .c, .S, .h and .hpp files are supported), the compiling system will automatically compile and link them.
Just write code, and same, no need to modify the Makefile script.
For instance, the following figure is the project tree of one of RoboPeak projects. Arduino-Lite will compile the whole source tree automatically. Like a magic, isn’t it?
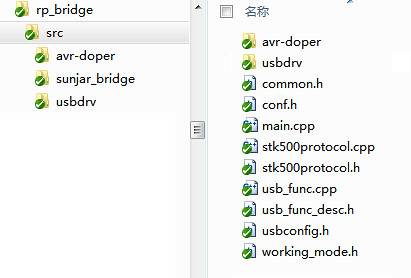
3.3 When and how to modify the Makefile script?
Makefile should be modified in the following situations:
- Target device differs from the default configuration of the Makefile
By default, the Makefile generate binary for Atmega168 at 16MHz
- Configure the upload/burn settings for target device
Arduino-Lite support serial port self-programming AVR bootloaders (Arduino compatiable) and programming blank AVR chips through RP USB Connector. If you need to configure the baud rate of the programmer, you need to modify the Makefile.
- Configuration the fuse of AVR chips
While programming with the RP USB Connector, you can specify the fuse data in the Makefile
- Customize the compilation process or referencing external libraries
If the compile-and-link-all model doesn’t fit your your requirement, or your project references libraries other than Arduino-Lite
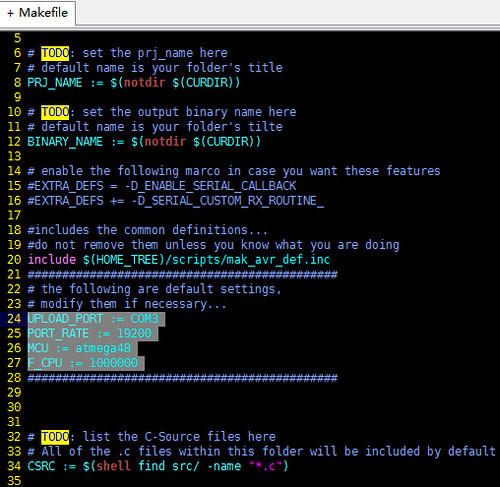
Makefile scripts are located at the root directory of each projects, all codes need to be modified in which are marked by “TODO”s. The following example will make Makefile generate binary for Atmega48 at 1MHz, and use COM3 to upload firmware.
3.4 Compile the project
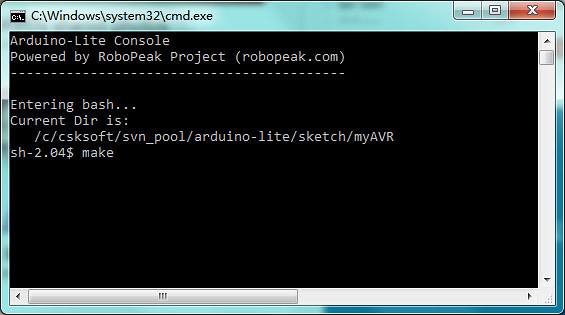
Arduino-Lite use the standard make command to construct project. In order to execute make, please run the launchsh.cmd batch file, which will launch the bash shell.
Enter “make” and press the enter key in the bash shell will trigger the project to compile:
If the project is compiled properly without any error, the script will show you some metadata of the binary:
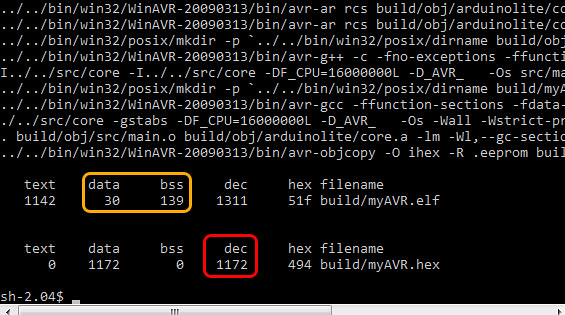
- The number in the red rectangle shows the firmware size (in bytes), this will be helpful to indicate if the firmware can be fully burned/uploaded to the target device.
- The number in the orange rectangle show the minim requirement of the memory (sram) . This parameter can be used to evaluate if the memory of the target device is enough.
3.5 Burn/upload binary to target device
3.5.1 Program Arduino and Arduino-compatible boards
You can just use “make upload” to program avr chips with bootloader supporting STK500v1 protocol, including:
- Most Arduino hardwares and its compatible boards delivered with the bootloader
- Any avr chips with this bootloader
The source code and pre-compiled binary of the bootloader can be found under the src/bootloaders directory.
Before burning or uploading, please insure:
- The target hardware has connected properly to the PC, and get the serial port of it (COM3 is the default)
- Confirm the baud rate of the bootloader (19200 is the default)
- If these parameters are not the same as the default one, please modify the Makefile
After the connection, enter “make upload” to upload the new firmware. The process should be like this:
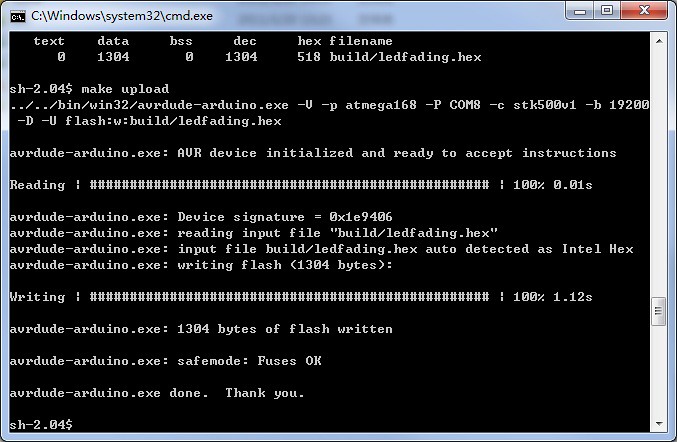
NOTICE: You might need to reboot the AVR chip manually on some non-standard Arduino devices.
3.5.2 Program any AVR chip based circuit system
Arduino-Lite compiling system integrated the support to AVR-Doper(http://www.obdev.at/products/vusb/avrdoper.html) and compatible programmers. You can use “make burn” to program any AVR chips or configure fuse.
RoboPeak developed a driver-less AVR-Doper compatible programmer support the usb port: RoboPeak USB Connector. We will introduce and open source this project in later articles.
Arduino-Lite support following burn/upload commands. The usage of these command are written at the end of this article.
- make burn
- make fuse
- make lock
- make erase
3.6 Available compilation targets
Compilation:
- “make” or “make all”
Compile current project
- make clean
Clean compilation results
Burn/Upload
- make upload
Upload hex to AVR chips via serial port (through bootloaders for STK500v2)
- make usbupload
Upload hex to AVR chips via usb port (through HidBootloaders)
- make burn
Burn hex to target AVR chips through RoboPeak USB Connector (or other Avr-doper-compatible programmers)
- make erase
Erase the target AVR chips through RoboPeak USB Connector (or other Avr-doper-compatible programmers)
- make fuse
Configure the fuse data of the target AVR chips through RoboPeak USB Connector (or other Avr-doper-compatible programmers)
- make lock
Configure the lock bits of the target AVR chips through RoboPeak USB Connector (or other Avr-doper-compatible programmers)
Code analysis and debugging
- make dump
De-assemble compiled efl files to AVR asm instructions
- make dumpobj
De-assemble compiled object files (*.o) to AVR asm instructions
In the next article, we will introduce the new functions provided by Arduino-Lite.

没有评论:
发表评论